Android - 意图和过滤器
Android Intent 意图是对要执行的操作的抽象描述。它可以与 startActivity 一起使用来启动一个活动,broadcastIntent 可以将其发送到任何感兴趣的 BroadcastReceiver 组件,以及 startService(Intent) 或 bindService(Intent, ServiceConnection, int) 与后台服务通信。
Intent 本身,一个 Intent 对象,是一个被动的数据结构,它包含对要执行的操作的抽象描述。
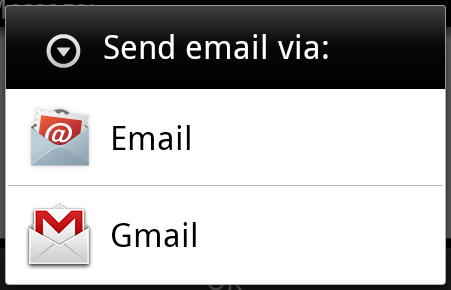
例如,假设您有一个 Activity 需要启动电子邮件客户端并使用您的 Android 设备发送电子邮件。为此,您的 Activity 将连同适当的 chooser 一起发送一个 ACTION_SEND 到 Android 意图解析器。 指定的选择器为用户提供了适当的界面来选择如何发送您的电子邮件数据。
Intent email = new Intent(Intent.ACTION_SEND, Uri.parse("mailto:"));
email.putExtra(Intent.EXTRA_EMAIL, recipients);
email.putExtra(Intent.EXTRA_SUBJECT, subject.getText().toString());
email.putExtra(Intent.EXTRA_TEXT, body.getText().toString());
startActivity(Intent.createChooser(email, "Choose an email client from..."));
上面的语法是调用 startActivity 方法来启动一个电子邮件活动,结果应该如下所示 −
例如,假设您有一个活动需要在您的 Android 设备上的网络浏览器中打开 URL。为此,您的 Activity 会将 ACTION_WEB_SEARCH Intent 发送到 Android 意图解析器以在 Web 浏览器中打开给定的 URL。 意图解析器解析活动列表并选择最符合您的意图的一个,在本例中为 Web 浏览器活动。然后意图解析器将您的网页传递给 Web 浏览器并启动网络浏览器活动。
String q = "tutorialspoint";
Intent intent = new Intent(Intent.ACTION_WEB_SEARCH );
intent.putExtra(SearchManager.QUERY, q);
startActivity(intent);
上面的示例将在 android 搜索引擎上搜索为 tutorialspoint,它会在您的活动中给出 tutorialspoint 的结果
有不同的机制可以将意图传递给每种类型的组件 − 活动、服务和广播接收器。
| 序号 | 方法 & 描述 |
|---|---|
| 1 |
Context.startActivity() Intent 对象被传递给此方法以启动新活动或获取现有活动以执行新操作。 |
| 2 |
Context.startService() Intent 对象被传递给此方法以启动服务或将新指令传递给正在进行的服务。 |
| 3 |
Context.sendBroadcast() Intent 对象被传递给此方法以将消息传递给所有感兴趣的广播接收器。 |
意图对象
Intent 对象是一组信息,由接收 Intent 的组件使用,以及 Android 系统使用的信息。
一个 Intent 对象可以根据它正在通信或将要执行的内容包含以下组件 −
Action
这是 Intent 对象的强制部分,是一个字符串,用于命名要执行的操作——或者,在广播意图的情况下,是发生并正在报告的操作。 动作在很大程度上决定了意图对象的其余部分是如何构造的。Intent 类定义了许多对应于不同意图的动作常量。 这是 Android Intent 标准操作的列表
Intent 对象中的动作可以通过 setAction() 方法设置并通过 getAction() 读取。
Data
将数据规范添加到意图过滤器。 规范可以只是一个数据类型(mimeType 属性),只是一个 URI,或者既是数据类型又是 URI。 URI 由其每个部分的单独属性指定 −
这些指定 URL 格式的属性是可选的,但也相互依赖 −
- 如果没有为意图过滤器指定方案,则忽略所有其他 URI 属性。
- 如果没有为过滤器指定主机,则忽略端口属性和所有路径属性。
setData() 方法仅将数据指定为 URI,setType() 仅将其指定为 MIME 类型,而 setDataAndType() 将其指定为 URI 和 MIME 类型。 URI 由 getData() 读取,类型由 getType() 读取。
动作/数据对的一些示例是 −
| 序号 | 动作/数据对 & 描述 |
|---|---|
| 1 | ACTION_VIEW content://contacts/people/1 显示标识符为"1"的人的信息。 |
| 2 |
ACTION_DIAL content://contacts/people/1 显示填写人的电话拨号器。 |
| 3 |
ACTION_VIEW tel:123 显示填写给定号码的电话拨号器。 |
| 4 |
ACTION_DIAL tel:123 显示填写给定号码的电话拨号器。 |
| 5 |
ACTION_EDIT content://contacts/people/1 编辑标识符为"1"的人的信息。 |
| 6 |
ACTION_VIEW content://contacts/people/ 显示用户可以浏览的人员列表。 |
| 7 |
ACTION_SET_WALLPAPER 显示选择壁纸的设置 |
| 8 |
ACTION_SYNC 它将同步数据,常量值为 android.intent.action.SYNC |
| 9 |
ACTION_SYSTEM_TUTORIAL 它将启动平台定义的教程(默认教程或启动教程) |
| 10 |
ACTION_TIMEZONE_CHANGED 当时区改变时它会提示 |
| 11 |
ACTION_UNINSTALL_PACKAGE 它用于运行默认卸载程序 |
Category
Category 是 Intent 对象的可选部分,它是一个字符串,其中包含有关应处理该意图的组件类型的附加信息。addCategory() 方法将类别放入 Intent 对象中,removeCategory() 删除先前添加的类别,getCategories() 获取当前对象中所有类别的集合。这是 Android Intent 标准类别的列表。
您可以在下面的部分查看 Intent 过滤器的详细信息,以了解我们如何使用类别来选择与 Intent 对应的适当活动。
Extras
这将在键值对中用于提供应传递给处理意图的组件的附加信息。可以分别使用 putExtras() 和 getExtras() 方法设置和读取额外内容。这是 Android Intent 标准额外数据的列表
Flags
这些标志是 Intent 对象的可选部分,并指示 Android 系统如何启动一个活动,以及在它启动后如何处理它等。
| 序号 | 标志 & 描述 |
|---|---|
| 1 |
FLAG_ACTIVITY_CLEAR_TASK 如果在传递给 Context.startActivity() 的 Intent 中设置,则此标志将导致与该活动相关联的任何现有任务在活动启动之前被清除。也就是说,该活动成为一个空任务的新根,并且所有旧活动都已完成。 这只能与 FLAG_ACTIVITY_NEW_TASK 结合使用。 |
| 2 |
FLAG_ACTIVITY_CLEAR_TOP 如果设置了,并且正在启动的活动已经在当前任务中运行,那么不是启动该活动的新实例,它上面的所有其他活动都将关闭,并且此 Intent 将作为新 Intent 交付给(现在位于顶部的)旧活动。 |
| 3 |
FLAG_ACTIVITY_NEW_TASK 此标志通常由想要呈现"launcher"启动器样式行为的活动使用: 它们为用户提供了一个可以完成的单独事情的列表,否则这些事情会完全独立于启动它们的活动而运行。 |
Component Name
这个可选字段是一个 android ComponentName 对象,代表 Activity、Service 或 BroadcastReceiver 类。如果已设置,则 Intent 对象将传递给指定类的实例,否则 Android 将使用 Intent 对象中的其他信息来定位合适的目标。
组件名称由 setComponent()、setClass() 或 setClassName() 设置,并由 getComponent() 读取。
意图类型
Android 支持以下两种类型的意图
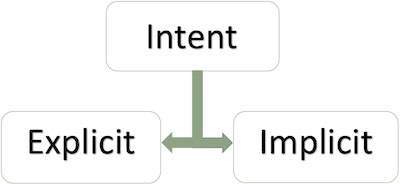
显式意图
显式意图将连接应用程序的内部世界,假设如果您想将一个活动连接到另一个活动,我们可以通过显式意图进行此引用,下图是通过单击按钮将第一个活动连接到第二个活动。
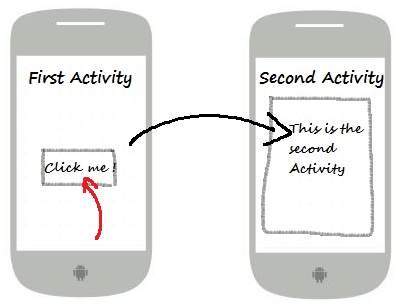
这些意图通过名称指定目标组件,它们通常用于应用程序内部消息 - 例如启动从属服务或启动姊妹活动的活动。 例如 −
// Explicit Intent by specifying its class name
Intent i = new Intent(FirstActivity.this, SecondActivity.class);

// Starts TargetActivity
startActivity(i);
隐式意图
这些意图不命名目标,组件名称字段留空。 隐式意图通常用于激活其他应用程序中的组件。 例如 −
Intent read1=new Intent();
read1.setAction(android.content.Intent.ACTION_VIEW);
read1.setData(ContactsContract.Contacts.CONTENT_URI);
startActivity(read1);
上面的代码会给出如下所示的结果
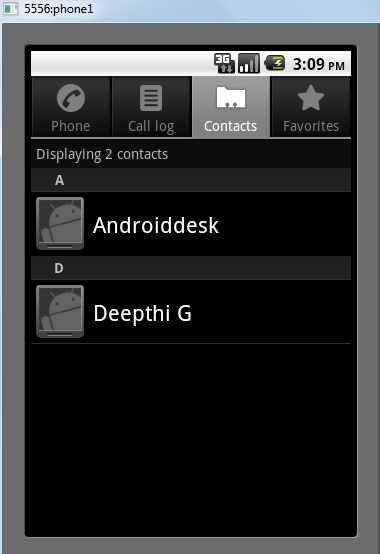
接收到意图的目标组件可以使用 getExtras() 方法来获取源组件发送的额外数据。 例如 −
// Get bundle object at appropriate place in your code
Bundle extras = getIntent().getExtras();

// Extract data using passed keys
String value1 = extras.getString("Key1");
String value2 = extras.getString("Key2");
示例
以下示例显示了启动各种 Android 内置应用程序的 Android Intent 的功能。
| 步骤 | 描述 |
|---|---|
| 1 | 您将使用 Android Studio IDE 创建一个 Android 应用程序,并将其命名为 My Application,位于包 com.example.saira_000.myapplication 下。 |
| 2 | 修改src/main/java/MainActivity.java文件,添加定义两个监听器对应两个按钮的代码,即启动浏览器并启动电话。 |
| 3 | 修改布局 XML 文件 res/layout/activity_main.xml 以在线性布局中添加三个按钮。 |
| 4 | 运行应用程序以启动 Android 模拟器并验证应用程序中所做更改的结果。 |
以下是修改后的主活动文件 src/com.example.My Application/MainActivity.java 的内容。
package com.example.saira_000.myapplication;

import android.content.Intent;
import android.net.Uri;
import android.support.v7.app.AppCompatActivity;
import android.os.Bundle;
import android.view.View;
import android.widget.Button;

public class MainActivity extends AppCompatActivity {
   Button b1,b2;

   @Override
   protected void onCreate(Bundle savedInstanceState) {
      super.onCreate(savedInstanceState);
      setContentView(R.layout.activity_main);

      b1=(Button)findViewById(R.id.button);
      b1.setOnClickListener(new View.OnClickListener() {

         @Override
         public void onClick(View v) {
            Intent i = new Intent(android.content.Intent.ACTION_VIEW,
               Uri.parse("http://www.example.com"));
            startActivity(i);
         }
      });

      b2=(Button)findViewById(R.id.button2);
      b2.setOnClickListener(new View.OnClickListener() {
         @Override
         public void onClick(View v) {
            Intent i = new Intent(android.content.Intent.ACTION_VIEW,
               Uri.parse("tel:9510300000"));
            startActivity(i);
         }
      });
   }
}
以下是 res/layout/activity_main.xml 文件的内容 −
<?xml version="1.0" encoding="utf-8"?>
<RelativeLayout xmlns:android="http://schemas.android.com/apk/res/android"
   xmlns:tools="http://schemas.android.com/tools"
   android:layout_width="match_parent"
   android:layout_height="match_parent"
   android:paddingLeft="@dimen/activity_horizontal_margin"
   android:paddingRight="@dimen/activity_horizontal_margin"
   android:paddingTop="@dimen/activity_vertical_margin"
   android:paddingBottom="@dimen/activity_vertical_margin"
   tools:context=".MainActivity">

   <TextView
      android:id="@+id/textView1"
      android:layout_width="wrap_content"
      android:layout_height="wrap_content"
      android:text="Intent Example"
      android:layout_alignParentTop="true"
      android:layout_centerHorizontal="true"
      android:textSize="30dp" />

   <TextView
      android:id="@+id/textView2"
      android:layout_width="wrap_content"
      android:layout_height="wrap_content"
      android:text="Tutorials point"
      android:textColor="#ff87ff09"
      android:textSize="30dp"
      android:layout_below="@+id/textView1"
      android:layout_centerHorizontal="true" />

   <ImageButton
      android:layout_width="wrap_content"
      android:layout_height="wrap_content"
      android:id="@+id/imageButton"
      android:src="@drawable/abc"
      android:layout_below="@+id/textView2"
      android:layout_centerHorizontal="true" />

   <EditText
      android:layout_width="wrap_content"
      android:layout_height="wrap_content"
      android:id="@+id/editText"
      android:layout_below="@+id/imageButton"
      android:layout_alignRight="@+id/imageButton"
      android:layout_alignEnd="@+id/imageButton" />

   <Button
      android:layout_width="wrap_content"
      android:layout_height="wrap_content"
      android:text="Start Browser"
      android:id="@+id/button"
      android:layout_alignTop="@+id/editText"
      android:layout_alignRight="@+id/textView1"
      android:layout_alignEnd="@+id/textView1"
      android:layout_alignLeft="@+id/imageButton"
      android:layout_alignStart="@+id/imageButton" />

   <Button
      android:layout_width="wrap_content"
      android:layout_height="wrap_content"
      android:text="Start Phone"
      android:id="@+id/button2"
      android:layout_below="@+id/button"
      android:layout_alignLeft="@+id/button"
      android:layout_alignStart="@+id/button"
      android:layout_alignRight="@+id/textView2"
      android:layout_alignEnd="@+id/textView2" />
</RelativeLayout>
以下将是 res/values/strings.xml 的内容来定义两个新常量 −
<?xml version="1.0" encoding="utf-8"?>
<resources>
   <string name="app_name">My Applicaiton</string>
</resources>
以下是 AndroidManifest.xml 的默认内容 −
<?xml version="1.0" encoding="utf-8"?>
<manifest xmlns:android="http://schemas.android.com/apk/res/android"
   package="com.example.saira_000.myapplication">

   <application
      android:allowBackup="true"
      android:icon="@mipmap/ic_launcher"
      android:label="@string/app_name"
      android:supportsRtl="true"
      android:theme="@style/AppTheme">
      <activity android:name=".MainActivity">
         <intent-filter>
            <action android:name="android.intent.action.MAIN" />
            <category android:name="android.intent.category.LAUNCHER" />
         </intent-filter>
      </activity>
   </application>
</manifest>
让我们尝试运行您的 My Application 应用程序。 假设您在进行环境设置时已经创建了 AVD。要从 Android Studio 运行应用程序,请打开项目的一个活动文件,然后单击工具栏中的运行  图标。Android Studio 在您的 AVD 上安装应用程序并启动它,如果您的设置和应用程序一切正常,它将显示以下 Emulator 窗口 −

现在点击 Start Browser 按钮,这将启动一个配置好的浏览器并显示 http://www.example.com 如下所示 −
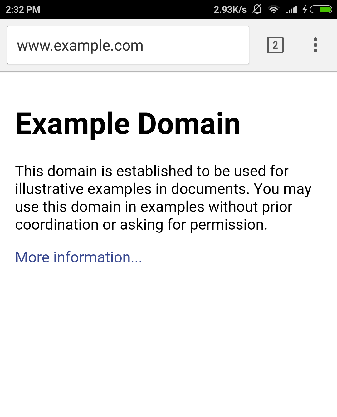
类似地,您可以使用"开始电话"按钮启动电话界面,这将允许您拨打已经给定的电话号码。
意图过滤器
您已经了解了如何使用 Intent 来调用另一个活动。 Android OS 使用过滤器来查明一组活动、服务和广播接收器,这些接收器可以借助与 Intent 关联的指定动作、类别和数据方案集来处理 Intent。您将使用清单文件中的 <intent-filter> 元素来列出与任何活动、服务或广播接收器关联的操作、类别和数据类型。
以下是 AndroidManifest.xml 文件的一部分的示例,用于指定一个活动 com.example.My Application.CustomActivity,该活动可以由上述两个动作、一个类别和一个数据中的任何一个调用 −
<activity android:name=".CustomActivity"
   android:label="@string/app_name">

   <intent-filter>
      <action android:name="android.intent.action.VIEW" />
      <action android:name="com.example.My Application.LAUNCH" />
      <category android:name="android.intent.category.DEFAULT" />
      <data android:scheme="http" />
   </intent-filter>

</activity>
一旦与上述过滤器一起定义了此活动,其他活动将能够使用 android.intent.action.VIEW 或使用 com.example.My Application.LAUNCH 操作调用此活动,前提是它们的类别是 android.intent.category.DEFAULT。
<data> 元素指定要调用的活动预期的数据类型,例如,我们的自定义活动希望数据以"http://"开头
可能存在一个意图可以通过多个活动或服务的过滤器的情况,可能会询问用户要激活哪个组件。 如果找不到目标,则会引发异常。
在调用活动之前有以下测试 Android 检查 −
如上所示,过滤器 <intent-filter> 可以列出多个操作,但此列表不能为空; 过滤器必须至少包含一个 <action> 元素,否则它将阻止所有意图。 如果提到了多个动作,那么 Android 会在调用活动之前尝试匹配提到的动作之一。
过滤器 <intent-filter> 可以列出零个、一个或多个类别。 如果没有提及类别,则 Android 始终通过此测试,但如果提及多个类别,则意图通过类别测试,Intent 对象中的每个类别都必须匹配过滤器中的类别。
每个 <data> 元素都可以指定一个 URI 和一个数据类型(MIME 媒体类型)。 URI 的每个部分都有单独的属性,例如 scheme、host、port 和 path。 包含 URI 和数据类型的 Intent 对象只有在其类型与过滤器中列出的类型匹配时才能通过测试的数据类型部分。
示例
以下示例是对上述示例的修改。 在这里,我们将看到如果一个意图正在调用定义的两个活动,Android 如何解决冲突,接下来如何使用过滤器调用自定义活动,第三个是如果 Android 没有为一个意图定义的适当活动文件的异常情况。
| 步骤 | 描述 |
|---|---|
| 1 | 您将使用 android studio 创建一个 Android 应用程序,并在 com.example.tutorialspoint7.myapplication; 包下将其命名为 My Application。 |
| 2 | 修改src/Main/Java/MainActivity.java文件,添加代码定义三个监听器,对应布局文件中定义的三个按钮。 |
| 3 | 添加一个新的 src/Main/Java/CustomActivity.java 文件以拥有一个自定义活动,该活动将由不同的意图调用。 |
| 4 | 修改布局 XML 文件 res/layout/activity_main.xml 以在线性布局中添加三个按钮。 |
| 5 | 添加一个布局 XML 文件 res/layout/custom_view.xml 以添加一个简单的 <TextView> 来显示通过意图传递的数据。 |
| 6 | 修改AndroidManifest.xml添加 |
| 7 | 运行应用程序以启动 Android 模拟器并验证应用程序中所做更改的结果。 |
以下是修改后的主活动文件src/MainActivity.java的内容。
package com.example.tutorialspoint7.myapplication;

import android.content.Intent;
import android.net.Uri;
import android.support.v7.app.AppCompatActivity;
import android.os.Bundle;
import android.view.View;
import android.widget.Button;

public class MainActivity extends AppCompatActivity {
   Button b1,b2,b3;
   @Override
   protected void onCreate(Bundle savedInstanceState) {
      super.onCreate(savedInstanceState);
      setContentView(R.layout.activity_main);
      b1=(Button)findViewById(R.id.button);
      b1.setOnClickListener(new View.OnClickListener() {

         @Override
         public void onClick(View v) {
            Intent i = new Intent(android.content.Intent.ACTION_VIEW,
               Uri.parse("http://www.example.com"));
            startActivity(i);
         }
      });

      b2 = (Button)findViewById(R.id.button2);
      b2.setOnClickListener(new View.OnClickListener() {
         @Override
         public void onClick(View v) {
            Intent i = new Intent("com.example.
               tutorialspoint7.myapplication.
                  LAUNCH",Uri.parse("http://www.example.com"));
            startActivity(i);
         }
      });

      b3 = (Button)findViewById(R.id.button3);
      b3.setOnClickListener(new View.OnClickListener() {
         @Override
         public void onClick(View v) {
            Intent i = new Intent("com.example.
               My Application.LAUNCH",
                  Uri.parse("https://www.example.com"));
            startActivity(i);
         }
      });
   }
}
以下是修改后的主活动文件src/com.example.My Application/CustomActivity.java的内容。
package com.example.tutorialspoint7.myapplication;

import android.app.Activity;
import android.net.Uri;
import android.os.Bundle;
import android.widget.TextView;

/**
 * Created by TutorialsPoint7 on 8/23/2016.
 */
public class CustomActivity extends Activity {
   @Override
   public void onCreate(Bundle savedInstanceState) {
      super.onCreate(savedInstanceState);
      setContentView(R.layout.custom_view);
      TextView label = (TextView) findViewById(R.id.show_data);
      Uri url = getIntent().getData();
      label.setText(url.toString());
   }
}
以下是 res/layout/activity_main.xml 文件的内容 −
<?xml version="1.0" encoding="utf-8"?>
<RelativeLayout
   xmlns:android="http://schemas.android.com/apk/res/android"
   xmlns:tools="http://schemas.android.com/tools"
   android:layout_width="match_parent"
   android:layout_height="match_parent"
   android:paddingBottom="@dimen/activity_vertical_margin"
   android:paddingLeft="@dimen/activity_horizontal_margin"
   android:paddingRight="@dimen/activity_horizontal_margin"
   android:paddingTop="@dimen/activity_vertical_margin"
   tools:context="com.example.tutorialspoint7.myapplication.MainActivity">

   <TextView
      android:id="@+id/textView1"
      android:layout_width="wrap_content"
      android:layout_height="wrap_content"
      android:text="Intent Example"
      android:layout_alignParentTop="true"
      android:layout_centerHorizontal="true"
      android:textSize="30dp" />

   <TextView
      android:id="@+id/textView2"
      android:layout_width="wrap_content"
      android:layout_height="wrap_content"
      android:text="Tutorials point"
      android:textColor="#ff87ff09"
      android:textSize="30dp"
      android:layout_below="@+id/textView1"
      android:layout_centerHorizontal="true" />

   <ImageButton
      android:layout_width="wrap_content"
      android:layout_height="wrap_content"
      android:id="@+id/imageButton"
      android:src="@drawable/abc"
      android:layout_below="@+id/textView2"
      android:layout_centerHorizontal="true" />

   <EditText
      android:layout_width="wrap_content"
      android:layout_height="wrap_content"
      android:id="@+id/editText"
      android:layout_below="@+id/imageButton"
      android:layout_alignRight="@+id/imageButton"
      android:layout_alignEnd="@+id/imageButton" />

   <Button
      android:layout_width="wrap_content"
      android:layout_height="wrap_content"
      android:text="Start Browser"
      android:id="@+id/button"
      android:layout_alignTop="@+id/editText"
      android:layout_alignLeft="@+id/imageButton"
      android:layout_alignStart="@+id/imageButton"
      android:layout_alignEnd="@+id/imageButton" />

   <Button
      android:layout_width="wrap_content"
      android:layout_height="wrap_content"
      android:text="Start browsing with launch action"
      android:id="@+id/button2"
      android:layout_below="@+id/button"
      android:layout_alignLeft="@+id/button"
      android:layout_alignStart="@+id/button"
      android:layout_alignEnd="@+id/button" />
   <Button
      android:layout_width="wrap_content"
      android:layout_height="wrap_content"
      android:text="Exceptional condition"
      android:id="@+id/button3"
      android:layout_below="@+id/button2"
      android:layout_alignLeft="@+id/button2"
      android:layout_alignStart="@+id/button2"
      android:layout_toStartOf="@+id/editText"
      android:layout_alignParentEnd="true" />
</RelativeLayout>
以下是 res/layout/custom_view.xml 文件的内容 −
<?xml version="1.0" encoding="utf-8"?>
<LinearLayout xmlns:android="http://schemas.android.com/apk/res/android"
   android:orientation="vertical" android:layout_width="match_parent"
   android:layout_height="match_parent">
   <TextView android:id="@+id/show_data"
      android:layout_width="fill_parent"
      android:layout_height="400dp"/>
</LinearLayout>
以下将是 res/values/strings.xml 的内容来定义两个新常量 −
<?xml version="1.0" encoding="utf-8"?>
<resources>
   <string name="app_name">My Application</string>
</resources>
以下是 AndroidManifest.xml 的默认内容 −
<?xml version="1.0" encoding="utf-8"?>
<manifest xmlns:android="http://schemas.android.com/apk/res/android"
   package="com.example.tutorialspoint7.myapplication">

   <application
      android:allowBackup = "true"
      android:icon = "@mipmap/ic_launcher"
      android:label = "@string/app_name"
      android:supportsRtl = "true"
      android:theme = "@style/AppTheme">
      <activity android:name = ".MainActivity">
         <intent-filter>
            <action android:name = "android.intent.action.MAIN" />
            <category android:name = "android.intent.category.LAUNCHER" />
         </intent-filter>
      </activity>

      <activity android:name="com.example.tutorialspoint7.myapplication.CustomActivity">

         <intent-filter>
            <action android:name = "android.intent.action.VIEW" />
            <action android:name = "com.example.tutorialspoint7.myapplication.LAUNCH" />
            <category android:name = "android.intent.category.DEFAULT" />
            <data android:scheme = "http" />
         </intent-filter>

      </activity>
   </application>

</manifest>
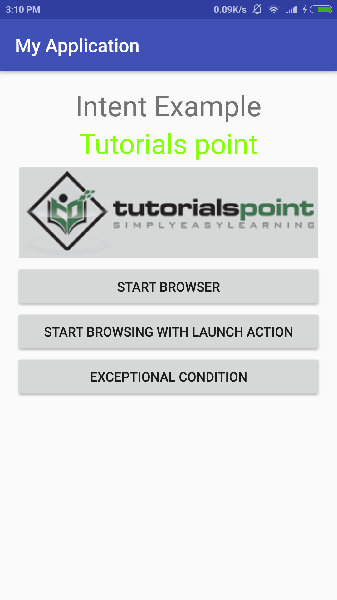
Let's try to run your My Application application. I assume you had created your AVD while doing environment setup. 要从 Android Studio 运行应用程序,请打开项目的活动文件之一,然后单击工具栏中的 Run 图标。 Android Studio 在您的 AVD 上安装应用程序并启动它,如果您的设置和应用程序一切正常,它将显示以下 Emulator 窗口 −
现在让我们从第一个按钮"Start Browser with VIEW Action"开始。在这里,我们已经使用过滤器 "android.intent.action.VIEW" 定义了我们的自定义活动,并且已经有一个针对 Android 定义的 VIEW 动作的默认活动,它正在启动 Web 浏览器,因此 Android 显示以下两个选项来选择您要启动的活动。
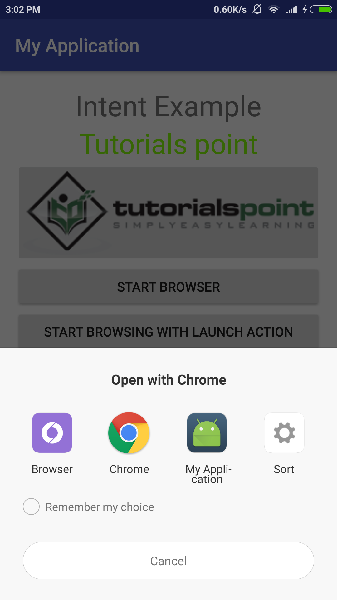
现在,如果您选择浏览器,那么 Android 将启动 Web 浏览器并打开 example.com 网站,但如果您选择 IndentDemo 选项,那么 Android 将启动 CustomActivity,它只会捕获传递的数据并显示在文本视图中,如下所示 −
现在使用返回按钮返回并单击"使用启动操作启动浏览器"按钮,这里 Android 应用过滤器来选择定义活动,它只是启动您的自定义活动
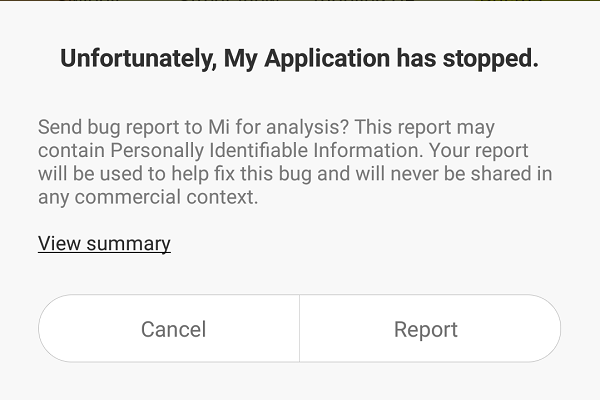
再次,使用返回按钮返回并单击 "Exception Condition" 按钮,这里 Android 尝试为给定的 Intent 找到一个有效的过滤器,但它没有找到定义的有效活动,因为这次我们使用数据作为 https 而不是 http 虽然我们给出了正确的操作,所以 Android 会引发异常并显示以下屏幕 −