Spring Security - OAuth2
内容
- OAuth2.0 基础知识
- OAuth2.0 入门(实用指南)
OAuth 2.0 基础知识
OAuth 2.0 由 IETF OAuth 工作组开发并于 2012 年 10 月发布。它是一种开放式授权协议,允许第三方应用程序代表资源所有者获得对 HTTP 服务的有限访问权限 .它可以在不泄露用户身份或长期凭据的情况下这样做。 第三方应用程序本身也可以代表它使用它。OAuth 的工作原理包括将用户身份验证委托给托管用户帐户的服务,并授权第三方应用程序访问用户帐户。
让我们考虑一个例子。 假设我们要登录一个网站"clientsite.com"。我们可以通过 Facebook、Github、Google 或 Microsoft 登录。 我们选择上面给出的选项中的任何选项,我们将被重定向到相应的网站进行登录。如果登录成功,系统会询问我们是否要让 clientsite.com 访问它请求的特定数据。我们选择我们想要的选项,然后我们将使用授权代码或错误代码重定向到 clientsite.com,我们的登录是否成功取决于我们在第三方资源中的操作。 这就是 OAuth 2 的基本工作原理。
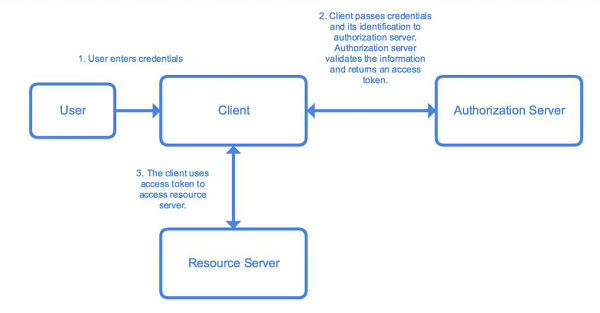
OAuth 系统涉及五个关键角色。 让我们把它们列出来 −
User / Resource Owner − 最终用户,负责身份验证并同意与客户端共享资源。
User-Agent − 用户使用的浏览器。
Client − 请求访问令牌的应用程序。
Authorization Server − 用于验证用户/客户端的服务器。 它发布访问令牌并在其整个生命周期内对其进行跟踪。
Resource Server − 提供对所请求资源的访问权限的 API。 它验证访问令牌并提供授权。
入门(实用指南)
我们将使用 Spring Security 和 OAuth 2.0 开发一个 Spring Boot 应用程序来说明上述内容。我们现在将开发一个带有内存数据库的基本应用程序来存储用户凭据。 该应用程序将使我们更容易理解 OAuth 2.0 与 Spring Security 的工作原理。
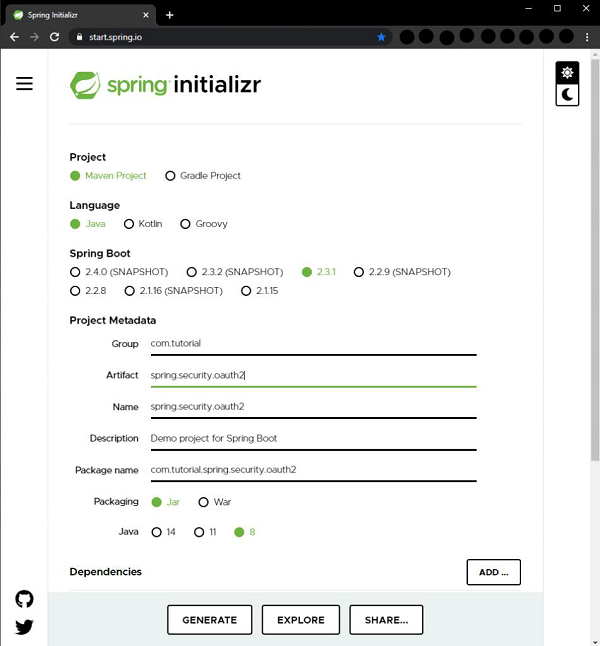
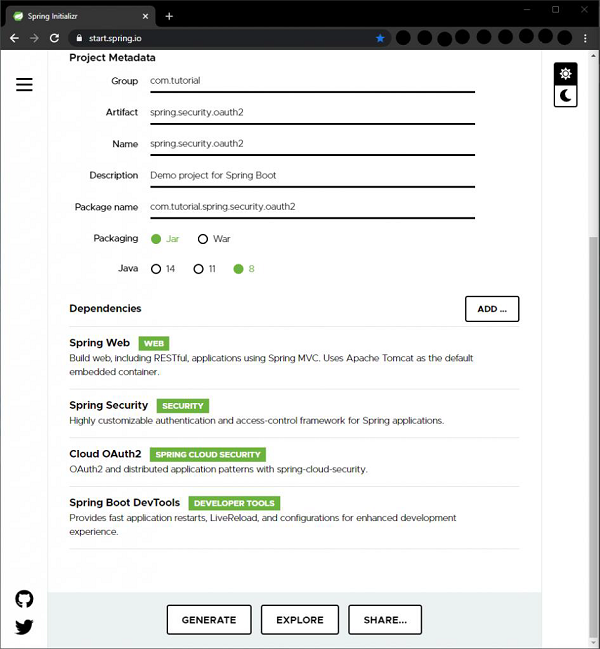
让我们使用 Spring 初始化程序在 Java 8 中创建一个 maven 项目。让我们从 start.spring.io 开始。 我们生成具有以下依赖项的应用程序 −
- Spring Web
- Spring 安全框架
- Cloud OAuth2
- Spring Boot 开发工具
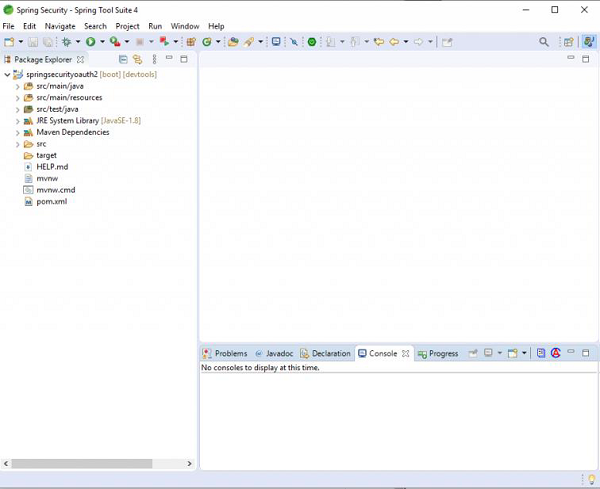
有了上面的配置,我们点击Generate按钮生成一个项目。 该项目将以 zip 文件的形式下载。 我们将 zip 解压到一个文件夹中。然后,我们可以在我们选择的 IDE 中打开项目。 我在这里使用 Spring Tools Suite,因为它针对 Spring 应用程序进行了优化。 我们也可以根据需要使用 Eclipse 或 IntelliJ Idea。
因此,我们在 STS 中打开项目,下载依赖项。 然后我们可以在我们的包资源管理器窗口中看到项目结构。 它应该类似于下面的屏幕截图。
如果我们打开 pom.xml 文件,我们可以查看与项目相关的依赖项和其他详细信息。 它应该看起来像这样。
实例
<?xml version="1.0" encoding="UTF-8"?>
<project xmlns="http://maven.apache.org/POM/4.0.0"
   xmlns:xsi="http://www.w3.org/2001/XMLSchema-instance"
   xsi:schemaLocation="http://maven.apache.org/POM/4.0.0
   https://maven.apache.org/xsd/maven-4.0.0.xsd">
   <modelVersion>4.0.0</modelVersion>
   <parent>
      <groupId>org.springframework.boot</groupId>
      <artifactId>spring-boot-starter-parent</artifactId>
      <version>2.3.1.RELEASE</version>
      <relativePath/> <!-- lookup parent from repository -->
   </parent>
   <groupId>com.tutorial</groupId>
   <artifactId>spring.security.oauth2</artifactId>
   <version>0.0.1-SNAPSHOT</version>
   <name>spring.security.oauth2</name>
   <description>Demo project for Spring Boot</description>
   <properties>
      <java.version>1.8</java.version>
      <spring-cloud.version>Hoxton.SR6</spring-cloud.version>
   </properties>
   <dependencies>
      <dependency>
         <groupId>org.springframework.boot<groupId>
         <artifactId>spring-boot-starter-security</artifactId>
      </dependency>
      <dependency>
         <groupId>org.springframework.boot</groupId>
         <artifactId>spring-boot-starter-web</artifactId>
      </dependency>
      <dependency>
         <groupId>org.springframework.cloud</groupId>
         <artifactId>spring-cloud-starter-oauth2</artifactId>
      </dependency>
      <dependency>
         <groupId>org.springframework.boot<groupId>
         <artifactId>spring-boot-devtools</artifactId>
         <scope>runtime</scope>
         <optional>true</optional>
      </dependency>
      <dependency>
         <groupId>org.springframework.boot</groupId>
         <artifactId>spring-boot-starter-test</artifactId>
         <scope>test</scope> <exclusions>    <exclusion>
            <groupId>org.junit.vintage</groupId>
            <artifactId>junit-vintage-engine</artifactId>
            </exclusion>
         </exclusions>
      <dependency>
      <dependency>
         <groupId>org.springframework.security</groupId>
         <artifactId>spring-security-test</artifactId>
         <scope>test</scope>
      </dependency>
   </dependencies>
      <dependencyManagement>
   <dependencies>
      <dependency>
         <groupId>org.springframework.cloud</groupId>
         <artifactId>spring-cloud-dependencies</artifactId>
         <version>${spring-cloud.version}</version>
         <type>pom</type>
         <scope>import</scope>
      </dependency>
   </dependencies>
   </dependencyManagement><build>
   <plugins>
      <plugin>
         <groupId>org.springframework.boot</groupId>
         <artifactId>spring-boot-maven-plugin</artifactId>
      </plugin>
   </plugins>
   </build>
</project>
现在,在我们应用程序的基础包中,即 com.tutorial.spring.security.oauth2,让我们添加一个名为 config 的新包,我们将在其中添加我们的配置类。
让我们创建我们的第一个配置类 UserConfig,它扩展了 Spring Security 的 WebSecurityConfigurerAdapter 类来管理客户端应用程序的用户。我们用 @Configuration 注解对该类进行注解,告诉 Spring 它是一个配置类。
实例
package com.tutorial.spring.security.oauth2.config;
import org.springframework.context.annotation.Bean;
import org.springframework.context.annotation.Configuration;
import org.springframework.security.authentication.AuthenticationManager;
import org.springframework.security.config.annotation.web.builders.HttpSecurity;
import org.springframework.security.config.annotation.web.configuration.WebSecurityConfigurerAdapter;
import org.springframework.security.core.userdetails.User;
import org.springframework.security.core.userdetails.UserDetails;
import org.springframework.security.core.userdetails.UserDetailsService;
import org.springframework.security.crypto.password.NoOpPasswordEncoder;
import org.springframework.security.crypto.password.PasswordEncoder;
import org.springframework.security.provisioning.InMemoryUserDetailsManager;
import org.springframework.security.provisioning.UserDetailsManager;
@Configuration public class UserConfig extends WebSecurityConfigurerAdapter {
   @Bean
   public UserDetailsService userDetailsService() {
      UserDetailsManager userDetailsManager = new InMemoryUserDetailsManager();
      UserDetails user = User.withUsername("john")
         .password("12345") .authorities("read")
      .build(); userDetailsManager.createUser(user); return userDetailsManager;
   }
   @Bean
   public PasswordEncoder passwordEncoder() {
      return NoOpPasswordEncoder.getInstance();
   }
   @Override
   @Bean
   public AuthenticationManager authenticationManagerBean() throws Exception {
      return super.authenticationManagerBean();
   }
}
然后我们添加一个 UserDetailsService 的 bean 来检索用户详细信息以进行身份验证和授权。 为了把它放在 Spring 上下文中,我们用 @Bean 注解它。为了使本教程简单易懂,我们使用 InMemoryUserDetailsManager 实例。 对于现实世界的应用程序,我们可以使用其他实现,如 JdbcUserDetailsManager 来连接数据库等。为了能够轻松地为本示例创建用户,我们使用 UserDetailsManager 接口,该接口扩展了 UserDetailsService 并具有 createUser()、updateUser() 等等。然后,我们使用 builder 类创建一个用户。 我们现在给他一个用户名、密码和"read"读取权限。然后,使用 createUser() 方法,我们添加新创建的用户并返回 UserDetailsManager 的实例,从而将其放入 Spring 上下文中。
为了能够使用我们定义的UserDetailsService,需要在Spring上下文中提供一个PasswordEncoder bean。 同样,为了简单起见,我们现在使用 NoOpPasswordEncoder。NoOpPasswordEncoder 不应该用于实际生产应用程序,因为它不安全。 NoOpPasswordEncoder 不对密码进行编码,仅对开发或测试场景或概念证明有用。我们应该始终使用 Spring Security 提供的其他高度安全的选项,其中最受欢迎的是 BCryptPasswordEncoder,我们将在后面的系列教程中使用它。 为了把它放在 Spring 上下文中,我们用 @Bean 注解方法。
然后我们重写 WebSecurityConfigurerAdapter 的 AuthenticationManager bean 方法,该方法返回 authenticationManagerBean 以将身份验证管理器放入 Spring 上下文中。
现在,为了添加客户端配置,我们添加了一个名为 AuthorizationServerConfig 的新配置类,它扩展了 Spring Security 的 AuthorizationServerConfigurerAdapter 类。AuthorizationServerConfigurerAdapter 类用于使用 spring security oauth2 模块配置授权服务器。我们也用@Configuration 注解这个类。 要将授权服务器功能添加到此类,我们需要添加 @EnableAuthorizationServer 注解,以便应用程序可以充当授权服务器。
实例
package com.tutorial.spring.security.oauth2.config;
import org.springframework.beans.factory.annotation.Autowired;
import org.springframework.context.annotation.Configuration;
import org.springframework.security.authentication.AuthenticationManager;
import org.springframework.security.oauth2.config.annotation.configurers.ClientDetailsServiceConfigurer;
import org.springframework.security.oauth2.config.annotation.web.configuration.AuthorizationServerConfigurerAdapter;
import org.springframework.security.oauth2.config.annotation.web.configuration.EnableAuthorizationServer;
import org.springframework.security.oauth2.config.annotation.web.configurers.AuthorizationServerEndpointsConfigurer; @Configuration @EnableAuthorizationServer
public class AuthorizationServerConfig extends AuthorizationServerConfigurerAdapter {
   @Autowired private AuthenticationManager authenticationManager;
   @Override
   public void configure(ClientDetailsServiceConfigurer clients) throws Exception {
      clients.inMemory() .withClient("oauthclient1") .secret("oauthsecret1") .scopes("read") .authorizedGrantTypes("password") }
   @Override
   public void configure(AuthorizationServerEndpointsConfigurer endpoints) throws Exception {
      endpoints.authenticationManager(authenticationManager);
   }
}
为了检查 oauth 令牌,Spring Security oauth 公开了两个端点 – /oauth/check_token 和 /oauth/token_key。. 默认情况下,这些端点受到 denyAll() 的保护。tokenKeyAccess() 和 checkTokenAccess() 方法打开这些端点以供使用。
我们将在 UserConfig 类中配置的 AuthenticationManager bean 自动装配为此处的依赖项,稍后我们将使用它。
然后,我们覆盖 AuthorizationServerConfigurerAdapter 的两个 configure() 方法,以提供客户端详细信息服务的内存实现。第一种使用 ClientDetailsServiceConfigurer 作为参数的方法,顾名思义,允许我们为授权服务器配置客户端。这些客户端代表将能够使用此授权服务器功能的应用程序。由于这是学习 OAuth2 实现的基本应用程序,我们现在将保持简单,并使用具有以下属性的内存实现 −
clientId − 客户的 ID。 必需的。
secret − 客户端密钥,受信任客户端所需
scope − 客户端的限制范围,即客户端权限。 如果留空或未定义,则客户端不受任何范围的限制。
authorizedGrantTypes − 客户端被授权使用的授权类型。 授权类型表示客户端从授权服务器获取令牌的方式。我们将使用"password"密码授权类型,因为它是最简单的。 稍后,我们将为另一个用例使用另一种授权类型。
在"password"密码授权授权类型中,用户需要向我们的客户端应用程序提供他(她)的用户名、密码和范围,然后客户端应用程序将这些凭据与其凭据一起用于我们希望从中获取令牌的授权服务器。
我们覆盖的另一个 configure() 方法,使用 AuthorizationServerEndpointsConfigurer 作为参数,用于将 AuthenticationManager 附加到授权服务器配置。
有了这些基本配置,我们的授权服务器就可以使用了。 让我们继续启动它并使用它。 我们将使用 Postman (https://www.postman.com/downloads/) 来提出我们的请求。
使用 STS 时,我们可以启动我们的应用程序并开始在控制台中查看日志。 当应用程序启动时,我们可以在控制台中找到我们的应用程序公开的 oauth2 端点。在这些端点中,我们现在将使用以下令牌 −
/oauth/token – 用于获取令牌。
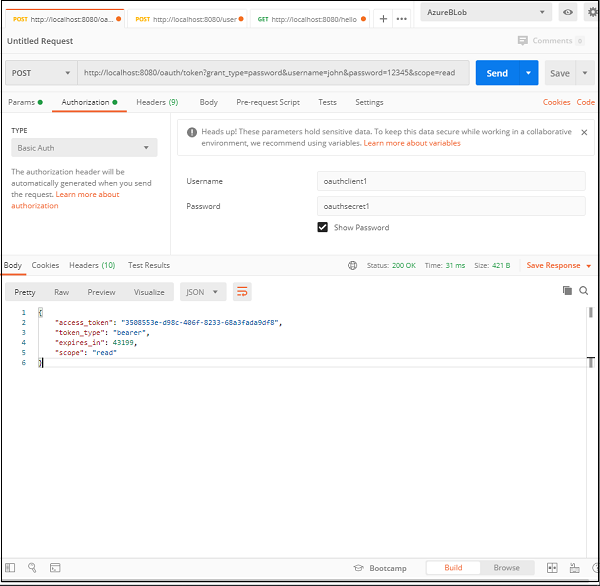
如果我们在这里查看 postman 快照,我们可以注意到一些事情。 让我们在下面列出它们。
- The URL − 我们的 Spring Boot 应用程序在本地机器的 8080 端口上运行,因此请求指向 http://localhost:8080。下一部分是 /oauth/token,我们知道,它是 OAuth 公开的用于生成令牌的端点。
- The query params−由于这是一种"password"密码授权授权类型,用户需要向我们的客户端应用程序提供他(她)的用户名、密码和范围,然后客户端应用程序将这些凭据连同其凭据一起使用到我们想要从中获取令牌的授权服务器。
- Client Authorization − Oauth 系统要求客户端获得授权才能提供令牌。 因此,在 Authorization 标头下,我们提供了客户端身份验证信息,即我们在应用程序中配置的用户名和密码。
让我们仔细看看查询参数和授权标头 −
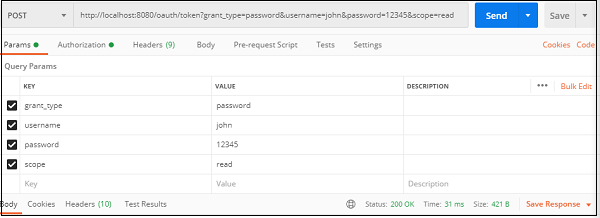
query 查询参数
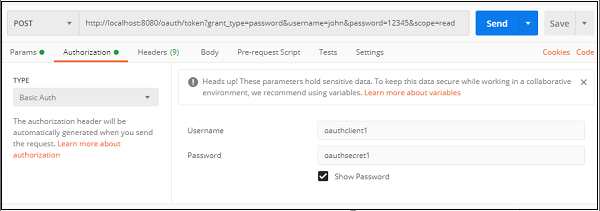
客户凭证
如果一切正确,我们将能够在响应中看到我们生成的令牌以及 200 ok 状态。

response 响应
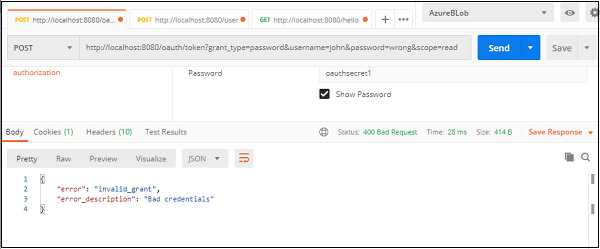
我们可以通过输入错误的凭据或没有凭据来测试我们的服务器,我们将返回一个错误,表明请求未经授权或凭据错误。
这是我们的基本 oauth 授权服务器,它使用密码授权类型来生成和提供密码。
接下来,让我们实现一个更安全、更常见的 oauth2 身份验证应用程序,即使用授权码授予类型。 为此,我们将更新我们当前的应用程序。
授权授权类型不同于密码授权类型,因为用户不必与客户端应用程序共享他的凭据。他只与授权服务器共享它们,作为回报,授权代码被发送到客户端,用于验证客户端。它比密码授予类型更安全,因为用户凭据不与客户端应用程序共享,因此用户的信息保持安全。 除非得到用户的批准,否则客户端应用程序无法访问任何重要的用户信息。
通过几个简单的步骤,我们可以在我们的应用程序中设置一个具有授权授予类型的基本 oauth 服务器。 让我们看看如何。
实例
package com.tutorial.spring.security.oauth2.config;
import org.springframework.beans.factory.annotation.Autowired;
import org.springframework.context.annotation.Configuration;
import org.springframework.security.authentication.AuthenticationManager;
import org.springframework.security.oauth2.config.annotation.configurers.ClientDetailsServiceConfigurer;
import org.springframework.security.oauth2.config.annotation.web.configuration.AuthorizationServerConfigurerAdapter;
import org.springframework.security.oauth2.config.annotation.web.configuration.EnableAuthorizationServer;
import org.springframework.security.oauth2.config.annotation.web.configurers.AuthorizationServerEndpointsConfigurer;
@Configuration
@EnableAuthorizationServer
public class AuthorizationServerConfig extends AuthorizationServerConfigurerAdapter {
   @Autowired private AuthenticationManager authenticationManager;
   @Override
   public void configure(ClientDetailsServiceConfigurer clients) throws Exception {
      clients.inMemory()
      .withClient("oauthclient1")
      .secret("oauthsecret1")
      .scopes("read") .authorizedGrantTypes("password")
      .and() .withClient("oauthclient2") .secret("oauthsecret2")
      .scopes("read") .authorizedGrantTypes("authorization_code")
      .redirectUris("http://locahost:9090");
   }
   @Override public void configure(AuthorizationServerEndpointsConfigurer endpoints) throws Exception {
      endpoints.authenticationManager(authenticationManager);
   }
}
让我们为这个操作添加第二个客户端 oauthclient2 为这个操作添加一个新的秘密和读取范围。 在这里,我们已将此客户端的授权类型更改为授权代码。我们还添加了一个重定向 URI,以便授权服务器可以回调客户端。 因此,基本上重定向 URI 是客户端的 URI。
现在,我们必须在用户和授权服务器之间建立连接。 我们必须为授权服务器设置一个接口,用户可以在其中提供凭据。我们使用 Spring Security 的 formLogin() 实现来实现该功能,同时保持简单。 我们还确保所有请求都经过身份验证。
实例
package com.tutorial.spring.security.oauth2.config;
import org.springframework.context.annotation.Bean;
import org.springframework.context.annotation.Configuration;
import org.springframework.security.authentication.AuthenticationManager;
import org.springframework.security.config.annotation.web.builders.HttpSecurity;
import org.springframework.security.config.annotation.web.configuration.WebSecurityConfigurerAdapter;
import org.springframework.security.core.userdetails.User;
import org.springframework.security.core.userdetails.UserDetails;
import org.springframework.security.core.userdetails.UserDetailsService;
import org.springframework.security.crypto.password.NoOpPasswordEncoder;
import org.springframework.security.crypto.password.PasswordEncoder;
import org.springframework.security.provisioning.InMemoryUserDetailsManager;
import org.springframework.security.provisioning.UserDetailsManager;
@SuppressWarnings("deprecation") @Configuration
public class UserConfig extends WebSecurityConfigurerAdapter {
   @Bean
   public UserDetailsService userDetailsService() {
      UserDetailsManager userDetailsManager = new InMemoryUserDetailsManager();
         UserDetails user = User.withUsername("john")
      .password("12345") .authorities("read") .build();
      userDetailsManager.createUser(user); return userDetailsManager;
   }
   @Bean public PasswordEncoder passwordEncoder() {
      return NoOpPasswordEncoder.getInstance();
    }
   @Override
   @Bean
   public AuthenticationManager authenticationManagerBean() throws Exception {
      return super.authenticationManagerBean();
   }
   @Override protected void configure(HttpSecurity http) throws Exception {
      http.formLogin(); http.authorizeRequests().anyRequest().authenticated();
   }
}
这完成了我们对授权授予类型的设置。 现在测试我们的设置并启动我们的应用程序。我们在 http://localhost:8080/oauth/authorize?response_type=code&client_id=oauthclient2&scope=read 启动浏览器。 我们将重定向到 Spring Security 的默认表单登录页面。
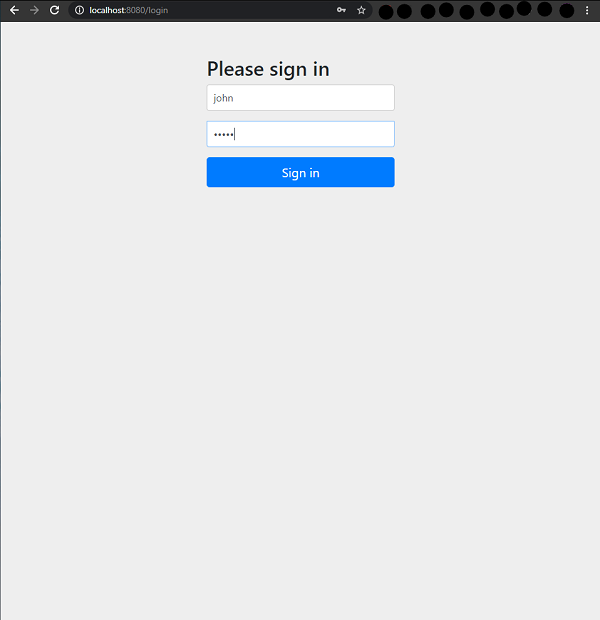
在这里,响应类型代码意味着授权服务器将返回一个访问代码,客户端将使用该访问代码进行登录。当我们使用用户凭据时,系统会在如下所示的类似屏幕中询问我是否要授予客户端要求的权限。
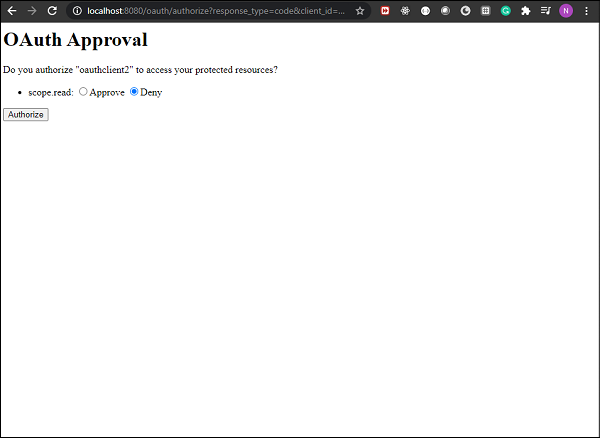
如果我们批准并单击授权,我们将看到我们被重定向到给定的重定向 url 以及访问代码。在我们的例子中,我们被重定向到 http://locahost:9090/?code=7Hibnw,正如我们在应用程序中指定的那样。 我们现在可以使用该代码作为 Postman 中的客户端登录到授权服务器。
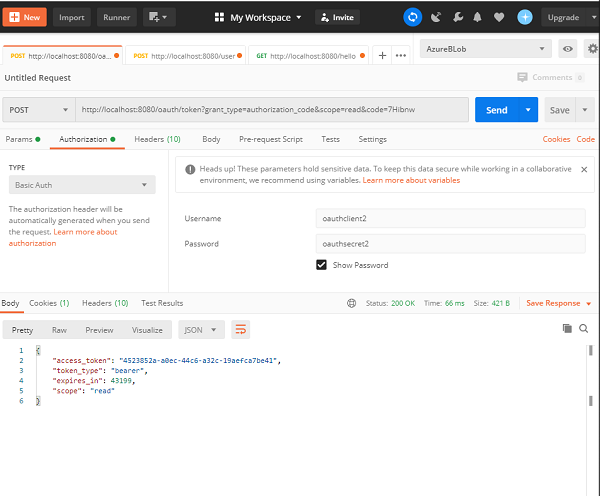
正如我们在这里看到的,我们在 URL 中使用了从授权服务器接收到的代码,授权类型为授权代码,范围为读取。 我们充当客户端并提供在我们的应用程序中配置的客户端凭据。当我们提出这个请求时,我们会取回我们可以进一步使用的 access_token。
因此,我们已经了解了如何使用 OAuth 2.0 配置 Spring Security。 该应用程序非常简单且易于理解,并帮助我们相当容易地理解该过程。我们使用了两种授权授予类型,并了解了如何使用它们来获取客户端应用程序的访问令牌。