Spring Security - Taglib
内容
- 简介和概述
- Spring 安全标签
- authorize 授权标签
- authentication 身份验证标签
- csrfInput 标签
- csrfMetaTags 标签
- 入门(实用指南)
简介和概述
在使用 JSP 的 Spring MVC 应用程序中,我们可以使用 Spring Security 标签来应用安全约束以及访问安全信息。 Spring Security Tag 库为此类操作提供了基本支持。 使用这样的标签,我们可以根据用户的角色或权限来控制向用户显示的信息。 此外,我们可以在表单中包含 CSRF 保护功能。
要使用 Spring 安全标签,我们必须在 JSP 文件中声明安全标签库。
<%@ taglib prefix="sec" uri="http://www.springframework.org/security/tags" %>
现在,我们可以使用带有"sec"前缀的 Spring Security 标签。 现在让我们看看标签的用法。
authorize 授权标签
我们将讨论的第一个标签是授权标签。 让我们看看一些使用示例。
<sec:authorize access="!isAuthenticated()"> Login </sec:authorize>
<sec:authorize access="isAuthenticated()"> Logout </sec:authorize>
<sec:authorize access="hasRole('ADMIN')"> Hello Admin. </sec:authorize>
正如我们所看到的,我们可以使用这个标签来隐藏或显示基于访问权限或角色的信息部分。 为了评估角色或访问权限,我们还使用以下 Spring 安全表达式 −
hasRole(“ADMIN”) − 如果当前用户具有管理员角色,则计算结果为 true。
hasAnyRole(‘ADMIN’,’USER’) − 如果当前用户具有任何列出的角色,则评估为 true
isAnonymous() − 如果当前用户是匿名用户,则计算结果为 true
isRememberMe() − 如果当前用户是记住我的用户,则评估为 true
isFullyAuthenticated() − 如果用户经过身份验证并且既不是匿名用户也不是记住我的用户,则计算结果为 true
正如我们所见,访问属性是指定 web-security 表达式的地方。 然后,Spring Security 评估表达式。评估通常委托给应用程序上下文中定义的 SecurityExpressionHandler<FilterInvocation>,。 如果它返回 true,则用户可以访问该部分中给出的信息。
如果我们将授权标签与 Spring Security 的权限评估器一起使用,我们还可以检查用户权限,如下所示 −
<sec:authorize access="hasPermission(#domain,'read') or hasPermission(#domain,'write')">
   This content is visible to users who have read or write permission.
</sec:authorize>
我们还可以允许或限制用户点击我们内容中的某些链接。
<sec:authorize url="/admin">
   This content will only be visible to users who are authorized to send requests to the "/admin" URL.
</sec:authorize>
authentication 认证标签
当我们想要访问存储在 Spring Security Context 中的当前 Authentication 对象时,我们可以使用 authentication 标签。 然后我们可以使用它直接在我们的 JSP 页面中呈现对象的属性。 例如,如果我们想在我们的页面中渲染Authentication对象的principal属性,我们可以这样做如下 −
<sec:authentication property="principal.username" />
csrfInput 标签
当启用 CSRF 保护时,我们可以使用 csrfInput 标签插入一个隐藏的表单字段,其中包含正确的 CSRF 保护令牌值。 如果未启用 CSRF 保护,则此标签不输出任何内容。
我们可以将标签与其他输入字段一起放在 HTML <form></form> 块中。 但是,我们不能将标签放在 <form:form></form:form> 块中,因为 Spring Security 会自动在这些标签中插入一个 CSRF 表单字段,并且还会自动处理 Spring 表单。
<form method="post" action="/do/something">
   <sec:csrfInput />
   Username:<br />
   <input type="text" username="username" />
   ...
</form>
csrfMetaTags 标签
我们可以使用这个标签插入包含 CSRF 保护令牌表单字段和标题名称以及 CSRF 保护令牌值的元标签。 这些元标记可用于在我们的应用程序中的 Javascript 中使用 CSRF 保护。 但是,只有在我们的应用程序中启用了 CSRF 保护时,此标签才有效,否则,此标签不会输出任何内容。
实例
<html>
   <head>
      <title>CSRF Protection in Javascript</title>
      <sec:csrfMetaTags />
      <script type="text/javascript" language="javascript">
         var csrfParam = $("meta[name='_csrf_param']").attr("content");
         var csrfToken = $("meta[name='_csrf']").attr("content");
      </script>
   </head>
   <body>
      ...
   </body>
</html>
入门(实用指南)
现在我们已经讨论了标签,让我们构建一个应用程序来演示标签的用法。 我们将使用 Spring Tool Suite 4 作为我们的 IDE。 此外,我们将使用 Apache Tomcat 服务器来为我们的应用程序提供服务。 那么,让我们开始吧。
设置应用程序
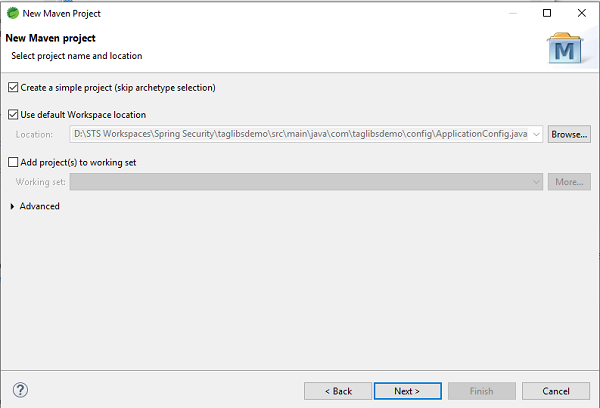
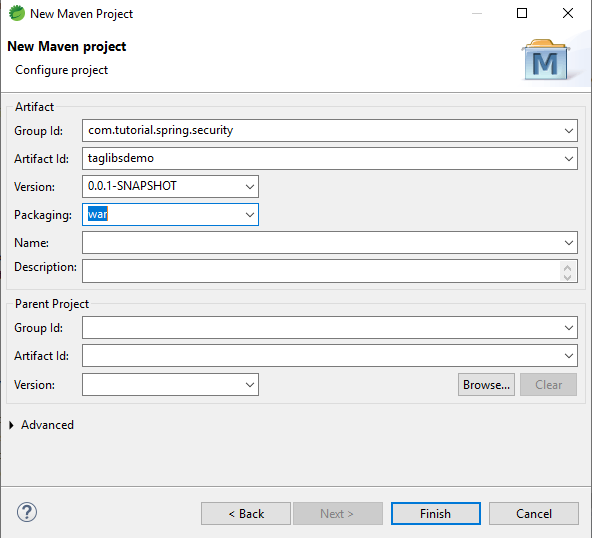
让我们在 STS 中创建一个简单的 Maven 项目。 我们可以将我们的应用程序命名为 taglibsdemo,并将其打包为 .war 文件。
当我们完成应用程序的设置后,它应该具有与此类似的结构。
pom.xml 文件
我们将以下这些依赖项添加到我们的应用程序中 −
- Spring Web MVC
- Spring-Security-Web
- Spring-Security-Core
- Spring-Security-Taglibs
- Spring-Security-Config
- Javax Servlet Api
- JSTL
添加这些依赖后,我们的 pom.xml 应该看起来像这样 −
实例
<project xmlns="http://maven.apache.org/POM/4.0.0"
   xmlns:xsi="http://www.w3.org/2001/XMLSchema-instance"
   xsi:schemaLocation="http://maven.apache.org/POM/4.0.0
   https://maven.apache.org/xsd/maven-4.0.0.xsd">
   <modelVersion>4.0.0</modelVersion>
   <groupId>com.tutorial.spring.security</groupId>
   <artifactId>taglibsdemo</artifactId>
   <version>0.0.1-SNAPSHOT</version>
   <packaging>war</packaging>
   <properties>
      <maven.compiler.target>1.8</maven.compiler.target>
      <maven.compiler.source>1.8</maven.compiler.source>
   </properties>
   <dependencies>
      <dependency>
         <groupId>org.springframework</groupId>
         <artifactId>spring-webmvc</artifactId>
         <version>5.0.2.RELEASE</version>
      </dependency>
      <dependency>
         <groupId>org.springframework.security</groupId>
         <artifactId>spring-security-web</artifactId>
         <version>5.0.0.RELEASE</version>
      </dependency>
      <dependency>
         <groupId>org.springframework.security</groupId>
         <artifactId>spring-security-core</artifactId>
         <version>5.0.4.RELEASE</version>
      </dependency>
      <dependency>
         <groupId>org.springframework.security</groupId>
         <artifactId>spring-security-taglibs</artifactId>
         <version>5.0.4.RELEASE</version>
      </dependency>
      <dependency>
         <groupId>org.springframework.security</groupId>
         <artifactId>spring-security-config</artifactId>
         <version>5.0.4.RELEASE</version>
      </dependency>
      <dependency>
         <groupId>javax.servlet</groupId>
         <artifactId>javax.servlet-api</artifactId>
         <version>3.1.0</version>
         <scope>provided</scope>
         </dependency> <dependency>
         <groupId>javax.servlet</groupId>
         <artifactId>jstl</artifactId>
         <version>1.2</version>
      </dependency>
   </dependencies>
   <build>
      <plugins>
         <plugin>
            <groupId>org.apache.maven.plugins</groupId>
            <artifactId>maven-war-plugin</artifactId>
            <version>2.6</version>
            <configuration>
            <failOnMissingWebXml>false</failOnMissingWebXml>
            </configuration>
         </plugin>
      </plugins>
   </build>
</project>
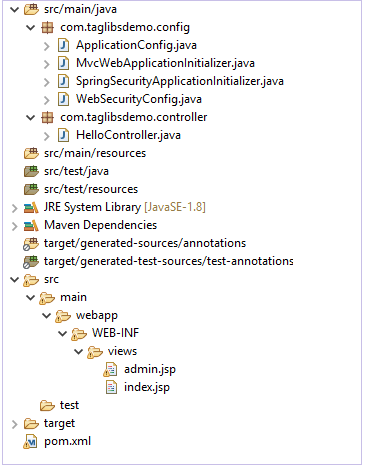
让我们为应用程序创建基础包。 我们可以将其命名为 com.taglibsdemo。 在包中,让我们为我们的配置文件创建另一个包。 由于它将保存配置文件,我们可以将其命名为 config。
ApplicationConfig.java
让我们创建我们的第一个配置类 ApplicationConfig.java。
实例
package com.taglibsdemo.config;

import org.springframework.context.annotation.Bean;
import org.springframework.context.annotation.ComponentScan;
import org.springframework.context.annotation.Configuration;
import org.springframework.web.servlet.config.annotation.EnableWebMvc;
import org.springframework.web.servlet.view.InternalResourceViewResolver;
import org.springframework.web.servlet.view.JstlView;

@EnableWebMvc
@Configuration @ComponentScan({ "com.taglibsdemo.controller"} )
public class ApplicationConfig {
   @Bean
   public InternalResourceViewResolver viewResolver() {
      InternalResourceViewResolver
      viewResolver = new InternalResourceViewResolver();
      viewResolver.setViewClass(JstlView.class);
      viewResolver.setPrefix("/WEB-INF/views/");
      viewResolver.setSuffix(".jsp"); return viewResolver;
   }
}
让我们在这里分解代码 −
- @EnableWebMvc − 我们使用 @EnableWebMvc 来启用 Spring MVC。 因此,我们将此注解添加到 @Configuration 类中,以从 WebMvcConfigurationSupport 导入 Spring MVC 配置。 WebMvcConfigurationSupport 是为 MVC Java 配置提供配置的主类。 不使用此注解可能会导致内容类型和接受标头等内容,通常内容协商不起作用。 @EnableWebMvc 注册了 RequestMappingHandlerMapping、RequestMappingHandlerAdapter 和 ExceptionHandlerExceptionResolver 等,以支持使用 @RequestMapping、@ExceptionHandler 等注解处理带有注解的控制器方法的请求。
- @配置 − 该注解表示该类声明了一个或多个@Bean 方法,并且可以由 Spring IoC 容器处理以在运行时为这些 bean 生成 bean 定义和服务请求。@Configuration 类通常使用 AnnotationConfigApplicationContext 或其支持 Web 的变体 AnnotationConfigWebApplicationContext 进行引导。
- @ComponentScan − @ComponentScan 注解用于告诉 Spring 包扫描带注解的组件。 @ComponentScan 还用于使用@ComponentScan 的basePackageClasses 或basePackages 属性来指定基础包和基础包类。
- InternalResourceViewResolver − 将提供的 URI 解析为格式前缀 + 视图名 + 后缀的实际 URI。
- setViewClass() − 设置应该用于创建视图的视图类。
- setPrefix() − 在构建 URL 时设置前缀以查看名称。
- setSuffix() − 在构建 URL 时设置附加到视图名称的后缀。
WebSecurityConfig.java
接下来我们将创建我们的 WebSecurityConfig 类,它将扩展熟悉的 Spring Security 的 WebSecurityConfigurerAdapter 类。
实例
package com.taglibsdemo.config;

import org.springframework.context.annotation.Bean;
import org.springframework.context.annotation.ComponentScan;
import org.springframework.security.config.annotation.web.builders.HttpSecurity;
import org.springframework.security.config.annotation.web.configuration.EnableWebSecurity;
import org.springframework.security.config.annotation.web.configuration.WebSecurityConfigurerAdapter;
import org.springframework.security.core.userdetails.UserDetailsService;
import org.springframework.security.provisioning.InMemoryUserDetailsManager;
import org.springframework.security.web.util.matcher.AntPathRequestMatcher;
import org.springframework.security.core.userdetails.User;
import org.springframework.security.core.userdetails.User.UserBuilder;
@EnableWebSecurity @ComponentScan("com.taglibsdemo")
public class WebSecurityConfig extends WebSecurityConfigurerAdapter {
   @SuppressWarnings("deprecation") @Bean
   public UserDetailsService userdetailsService() {
      UserBuilder users = User.withDefaultPasswordEncoder();
      InMemoryUserDetailsManager manager = new InMemoryUserDetailsManager();
      manager.createUser(users.username("rony").password("rony123").roles("USER").build());
      manager.createUser(users.username("admin").password("admin123").roles("ADMIN").build());
      return manager;
   }
   @Override protected void configure(HttpSecurity http) throws Exception {
      http.authorizeRequests() .antMatchers("/index", "/").permitAll()
      .antMatchers("/admin", "/user").authenticated() .and() .formLogin()
      .and() .logout() .logoutRequestMatcher(
         new AntPathRequestMatcher("/logout")
      );
   }
}
让我们在这里分解代码 −
- WebSecurityConfigurerAdapter − 实现 WebSecurityConfigurer WebSecurityConfigurer 并允许我们覆盖安全配置方法的抽象类。
- @EnableWebSecurity − 它使 Spring 能够自动查找 @Configuration 类并将其应用于全局 WebSecurity。
- 然后,我们使用 InMemoryUserDetailsManager 实例创建用户的方法创建一个 UserDetailsService Bean。 我们创建了两个用户——一个角色为"USER",另一个角色为"ADMIN",并将它们添加到 Spring Security。
- 之后,我们以 HttpSecurity 作为参数覆盖 configure 方法。 我们使所有人都可以访问我们的主页或索引页面,并且在用户通过身份验证时可以访问管理页面。 接下来,我们添加 Spring Security 表单登录和注销。
因此,通过这些步骤,我们的安全配置就完成了。 现在,我们准备好进行下一步了。
SpringSecurityApplicationInitializer.java
继续前进,现在我们将创建 SpringSecurityApplicationInitializer.java 类,它扩展了 Spring Security 的 AbstractSecurityWebApplicationInitializer 类。
package com.taglibsdemo.config;
import org.springframework.security.web.context.AbstractSecurityWebApplicationInitializer;
public class SpringSecurityApplicationInitializer extends
AbstractSecurityWebApplicationInitializer { }
AbstractSecurityWebApplicationInitializer 是实现 Spring 的 WebApplicationInitializer 的抽象类。 因此,如果类路径包含 spring-web 模块,SpringServletContainerInitializer 将初始化该类的具体实现。
MvcWebApplicationInitializer.java
实例
package com.taglibsdemo.config;
import org.springframework.web.servlet.support.AbstractAnnotationConfigDispatcherServletInitializer;
public class MvcWebApplicationInitializer extends
AbstractAnnotationConfigDispatcherServletInitializer {
   @Override protected Class</?>[] getRootConfigClasses() {
      return new Class[] {WebSecurityConfig.class};
   }
   @Override protected Class</?>[] getServletConfigClasses() {
      return null;
   }
   @Override protected String[] getServletMappings() {
      return new String[] {"/"};
   }
}
- AbstractAnnotationConfigDispatcherServletInitializer − 此类扩展了 WebApplicationInitializer。 我们需要这个类作为在 Servlet 容器环境中初始化 Spring 应用程序的基类。因此,AbstractAnnotationConfigDispatcherServletInitializer 的子类将提供带有 @Configuration 注解的类、Servlet 配置类和 DispatcherServlet 映射模式。
- getRootConfigClasses() − 该方法必须由扩展 AbstractAnnotationConfigDispatcherServletInitializer 的类实现。 它提供"root"根应用程序上下文配置。
- getServletConfigClasses() − 也必须实现此方法以提供 DispatcherServlet 应用程序上下文配置。
- getServletMappings() − 此方法用于指定 DispatcherServlet 的 servlet 映射。
我们已经设置了配置类。 现在,我们将创建我们的控制器来为 JSP 页面提供服务。
HelloController.java
实例
package com.taglibsdemo.controller;
import org.springframework.stereotype.Controller;
import org.springframework.web.bind.annotation.GetMapping;
@Controller public class HelloController {
@GetMapping("/")
   public String index() { return "index"; }
   @GetMapping("/user")
   public String user() { return "admin"; }
   @GetMapping("/admin")
   public String admin() { return "admin"; }
}
在这里,我们创建了三个端点 - "/"、"/user" 和 "/admin"。正如我们之前的配置中所指定的,我们将允许未经授权的访问索引页面"/"。 另一方面,"/user"和"/admin"端点只能被授权访问。
安全的内容服务
继续前进,我们现在将创建 JSP 页面,这些页面将在到达特定端点时提供服务。
为此,在我们的 src/main 文件夹中,我们创建了一个名为 webapp 的文件夹。 在这个文件夹中,我们创建了 WEB-INF 文件夹,并在 ApplicationConfig.java 类中进一步添加了 views 文件夹。 在这里,在这个文件夹中,我们将添加视图。
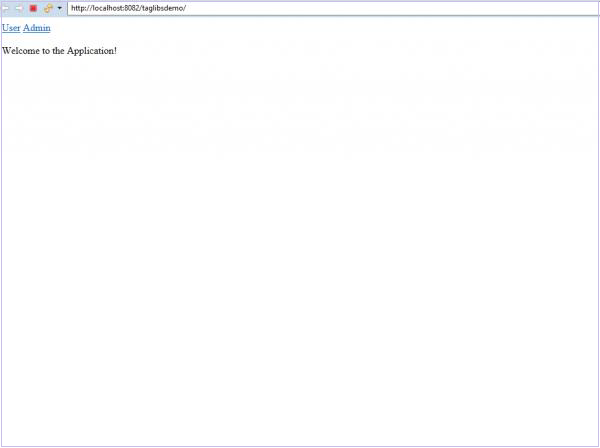
让我们先添加我们的主页,即 index.jsp。
实例
<%@ page language="java" contentType="text/html;
   charset=ISO-8859-1" pageEncoding="ISO-8859-1"%>
<!DOCTYPE html>
<html>
   <head>
      <meta charset="ISO-8859-1">
      <title>Home Page</title>
   </head>
   <body>
      <a href="user">User</a>
      <a href="admin">Admin</a>
      <br>
      <br> Welcome to the Application!
   </body>
</html>
然后我们将创建我们的 admin.jsp 文件。 让我们添加它。
实例
<%@ page language="java" contentType="text/html;
   charset=ISO-8859-1" pageEncoding="ISO-8859-1"%>
<%@ taglib uri="http://www.springframework.org/security/tags" prefix="security"%>
<!DOCTYPE html>
<html>
   <head>
      <meta charset="ISO-8859-1">
      <meta http-equiv="Content-Type" content="text/html; charset=UTF-8">
      <title>Insert title here</title>
   </head>
   <body> Welcome to Admin Page! <a href="logout"> Logout </a>
      <br>
      <br>
      <security:authorize access="hasRole('ADMIN')"> Hello Admin!
      </security:authorize>
   </body>
</html>
在这里,我们添加了 <%@ taglib uri="http://www.springframework.org/security/tags" prefix="security"%>。这将让我们使用之前讨论的 Spring 安全标签库。 如我们所见,我们在内容周围添加了"authorize"授权标签。此内容只能由我们的管理员访问。 访问此页面的任何其他用户将无法查看此内容。
运行应用程序
我们现在右键单击项目并选择在服务器上运行。 当服务器启动并且我们的应用程序正在运行时,我们可以在浏览器上访问 localhost:8080/taglibsdemo/ 来查看页面。
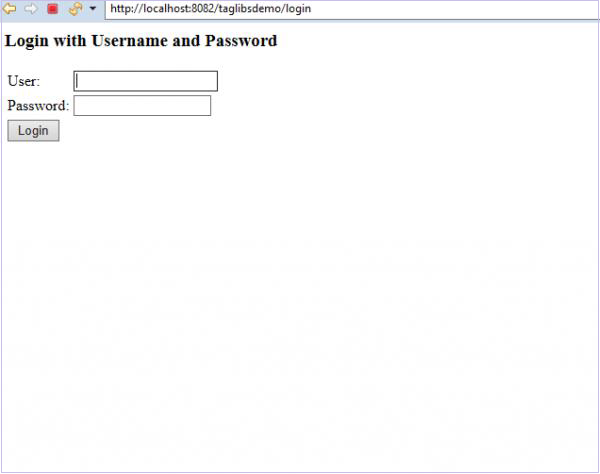
Login 登录页面
现在,如果我们单击应用程序中的用户链接,我们将被要求登录。
在这里,正如我们在控制器中看到的那样,我们正在为用户和管理员链接提供管理页面。 但是我们的用户,如果他不是管理员,则无法查看受我们的"authorize"授权标签保护的内容。
让我们先以用户身份登录。
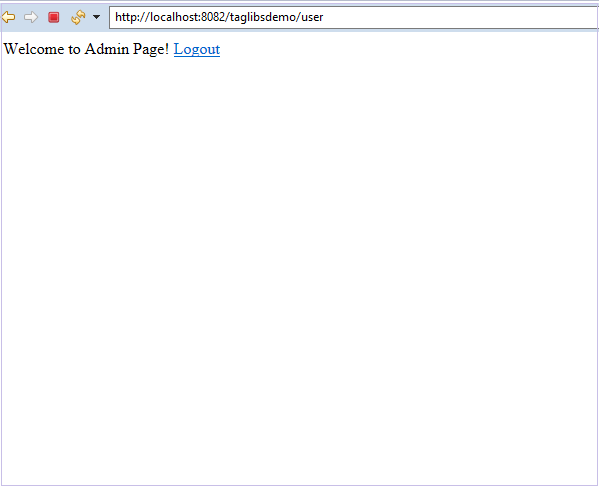
我们可以看到 "Hello Admin!" 的内容对我们是不可见的。 这是因为当前用户没有管理员角色。
现在让我们注销并以管理员身份登录。
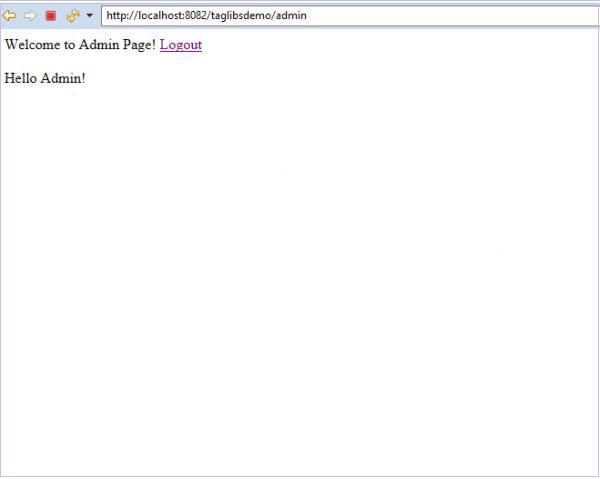
我们现在可以看到受保护的内容 "Hello Admin!",因为当前用户具有管理员角色。
结论
我们已经学习了如何使用 Spring Security 标签库来保护我们的内容并访问 Spring Security Context 中的当前 Authentication 对象。