iOS - 拆分视图
使用 Split 拆分视图
Split 拆分视图是 iPad 特定的容器,用于并排管理两个视图控制器的视图控制器,左侧是主视图控制器,右侧是详细视图控制器。
重要属性
- delegate
- viewControllers
示例代码和步骤
步骤 1 − 创建一个新项目并选择 Master Detail Application 而不是基于视图的应用程序,然后单击下一步,提供项目名称并选择创建。
步骤 2 − 默认情况下,会在 master 中创建一个简单的拆分视图控制器,其中包含一个表视图。
步骤 3 − 创建的文件与我们基于视图的应用程序略有不同。 在这里,我们为我们创建了以下文件。
- AppDelegate.h
- AppDelegate.m
- DetailViewController.h
- DetailViewController.m
- DetailViewController.xib
- MasterViewController.h
- MasterViewController.m
- MasterViewController.xib
步骤 4 − AppDelegate.h 文件如下 −
实例
#import <UIKit/UIKit.h>

@interface AppDelegate : UIResponder <UIApplicationDelegate>

@property (strong, nonatomic) UIWindow *window;

@property (strong, nonatomic) UISplitViewController *splitViewController;

@end
步骤 5 − AppDelegate.m中的didFinishLaunchingWithOptions方法如下 −
实例
- (BOOL)application:(UIApplication *)application
   didFinishLaunchingWithOptions:(NSDictionary *)launchOptions
   self.window = [[UIWindow alloc] initWithFrame:[[UIScreen mainScreen]bounds]];

   // Override point for customization after application launch.
   MasterViewController *masterViewController = [[MasterViewController
   alloc] initWithNibName:@"MasterViewController" bundle:nil];
   UINavigationController *masterNavigationController =
   [[UINavigationController alloc] initWithRootViewController:
   masterViewController];

   DetailViewController *detailViewController =
   [[DetailViewController alloc] initWithNibName:@"DetailViewController"
   bundle:nil];
   UINavigationController *detailNavigationController =
   [[UINavigationController alloc] initWithRootViewController:
   detailViewController];

   masterViewController.detailViewController = detailViewController;

   self.splitViewController = [[UISplitViewController alloc] init];
   self.splitViewController.delegate = detailViewController;
   self.splitViewController.viewControllers =
      @[masterNavigationController, detailNavigationController];

   self.window.rootViewController = self.splitViewController;
   [self.window makeKeyAndVisible];
   return YES;
步骤 6 − MasterViewController.h 如下 −
实例
#import <UIKit/UIKit.h>

@class DetailViewController;
@interface MasterViewController : UITableViewController
@property (strong, nonatomic) DetailViewController *detailViewController;

@end
步骤 7 − MasterViewController.m 如下 −
实例
#import "MasterViewController.h"
#import "DetailViewController.h"

@interface MasterViewController () {
   NSMutableArray *_objects;
}
@end

@implementation MasterViewController

- (id)initWithNibName:(NSString *)nibNameOrNil bundle:(NSBundle *)
   nibBundleOrNil {
   self = [super initWithNibName:nibNameOrNil bundle:nibBundleOrNil];

   if (self) {
      self.title = NSLocalizedString(@"Master", @"Master");
      self.clearsSelectionOnViewWillAppear = NO;
      self.contentSizeForViewInPopover = CGSizeMake(320.0, 600.0);
   }
   return self;
}

- (void)viewDidLoad {
   [super viewDidLoad];
   self.navigationItem.leftBarButtonItem = self.editButtonItem;

   UIBarButtonItem *addButton = [[UIBarButtonItem alloc]
   initWithBarButtonSystemItem: UIBarButtonSystemItemAdd
   target:self action:@selector(insertNewObject:)];
   self.navigationItem.rightBarButtonItem = addButton;
}

- (void)didReceiveMemoryWarning {
   [super didReceiveMemoryWarning];
   // Dispose of any resources that can be recreated.
}

- (void)insertNewObject:(id)sender {
   if (!_objects) {
      _objects = [[NSMutableArray alloc] init];
   }

   [_objects insertObject:[NSDate date] atIndex:0];
   NSIndexPath *indexPath = [NSIndexPath indexPathForRow:0 inSection:0];
   [self.tableView insertRowsAtIndexPaths:@[indexPath] withRowAnimation:
   UITableViewRowAnimationAutomatic];
}

#pragma mark - Table View

- (NSInteger)numberOfSectionsInTableView:(UITableView *)tableView {
   return 1;
}

- (NSInteger)tableView:(UITableView *)tableView numberOfRowsInSection:
   (NSInteger)section {
   return _objects.count;
}

// Customize the appearance of table view cells.
- (UITableViewCell *)tableView:(UITableView *)tableView cellForRowAtIndexPath:
   (NSIndexPath *)indexPath {
   static NSString *CellIdentifier = @"Cell";

   UITableViewCell *cell = [tableView dequeueReusableCellWithIdentifier:
   CellIdentifier];

   if (cell == nil) {
      cell = [[UITableViewCell alloc] initWithStyle:
      UITableViewCellStyleDefault reuseIdentifier:CellIdentifier];
   }
   NSDate *object = _objects[indexPath.row];
   cell.textLabel.text = [object description];
   return cell;
}

- (BOOL)tableView:(UITableView *)tableView canEditRowAtIndexPath:
   (NSIndexPath *)indexPath {
   // Return NO if you do not want the specified item to be editable.
   return YES;
}

- (void)tableView:(UITableView *)tableView commitEditingStyle:
   (UITableViewCellEditingStyle)editingStyle forRowAtIndexPath:
   (NSIndexPath *)indexPath {

   if (editingStyle == UITableViewCellEditingStyleDelete) {
      [_objects removeObjectAtIndex:indexPath.row];
      [tableView deleteRowsAtIndexPaths:@[indexPath] withRowAnimation:
      UITableViewRowAnimationFade];
   } else if (editingStyle == UITableViewCellEditingStyleInsert) {
      // Create a new instance of the appropriate class, insert it into
      //the array, and add a new row to the table view.
   }
}

/*
// Override to support rearranging the table view.
- (void)tableView:(UITableView *)tableView moveRowAtIndexPath:
   (NSIndexPath *) fromIndexPath toIndexPath:(NSIndexPath *)toIndexPath {
}
*/

/*
// Override to support conditional rearranging of the table view.
- (BOOL)tableView:(UITableView *)tableView canMoveRowAtIndexPath:
   (NSIndexPath *)indexPath {
   // Return NO if you do not want the item to be re-orderable.
   return YES;
}
*/

- (void)tableView:(UITableView *)tableView didSelectRowAtIndexPath:
   (NSIndexPath *)indexPath {
   NSDate *object = _objects[indexPath.row];
   self.detailViewController.detailItem = object;
   NSDateFormatter *formatter = [[NSDateFormatter alloc] init];
   [formatter setDateFormat: @"yyyy-MM-dd HH:mm:ss zzz"];
   NSString *stringFromDate = [formatter stringFromDate:object];
   self.detailViewController.detailDescriptionLabel.text = stringFromDate;
}
@end
步骤 8 − DetailViewController.h 如下 −
实例
#import <UIKit/UIKit.h>

@interface DetailViewController : UIViewController
<UISplitViewControllerDelegate>

@property (strong, nonatomic) id detailItem;

@property (weak, nonatomic) IBOutlet UILabel *detailDescriptionLabel;
@end
步骤 9 − DetailViewController.m 如下 −
实例
#import "DetailViewController.h"

@interface DetailViewController ()
@property (strong, nonatomic) UIPopoverController *masterPopoverController;
- (void)configureView;
@end

@implementation DetailViewController

#pragma mark - Managing the detail item

- (void)setDetailItem:(id)newDetailItem {
   if (_detailItem != newDetailItem) {
      _detailItem = newDetailItem;

      // Update the view.
      [self configureView];
   }

   if (self.masterPopoverController != nil) {
      [self.masterPopoverController dismissPopoverAnimated:YES];
   }
}

- (void)configureView {
   // Update the user interface for the detail item.

   if (self.detailItem) {
      self.detailDescriptionLabel.text = [self.detailItem description];
   }
}

- (void)viewDidLoad {
   [super viewDidLoad];
   [self configureView];
}

- (void)didReceiveMemoryWarning {
   [super didReceiveMemoryWarning];
   // Dispose of any resources that can be recreated.
}

- (id)initWithNibName:(NSString *)nibNameOrNil bundle:
   (NSBundle *)nibBundleOrNil {
   self = [super initWithNibName:nibNameOrNil bundle:nibBundleOrNil];

   if (self) {
      self.title = NSLocalizedString(@"Detail", @"Detail");
   }
   return self;
}

#pragma mark - Split view

- (void)splitViewController:(UISplitViewController *)splitController
   willHideViewController:(UIViewController *)viewController withBarButtonItem:
   (UIBarButtonItem *)barButtonItem forPopoverController:
   (UIPopoverController *)popoverController {
   barButtonItem.title = NSLocalizedString(@"Master", @"Master");
   [self.navigationItem setLeftBarButtonItem:barButtonItem animated:YES];
   self.masterPopoverController = popoverController;
}

- (void)splitViewController:(UISplitViewController *)splitController
   willShowViewController:(UIViewController *)viewController
   invalidatingBarButtonItem:(UIBarButtonItem *)barButtonItem {
   // Called when the view is shown again in the split view,
   //invalidating the button and popover controller.
   [self.navigationItem setLeftBarButtonItem:nil animated:YES];
   self.masterPopoverController = nil;
}
@end
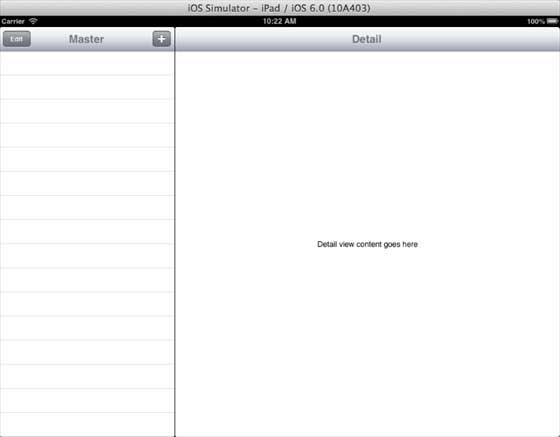
步骤 10 − 当我们运行应用程序时,我们将在横向模式下获得以下输出 −
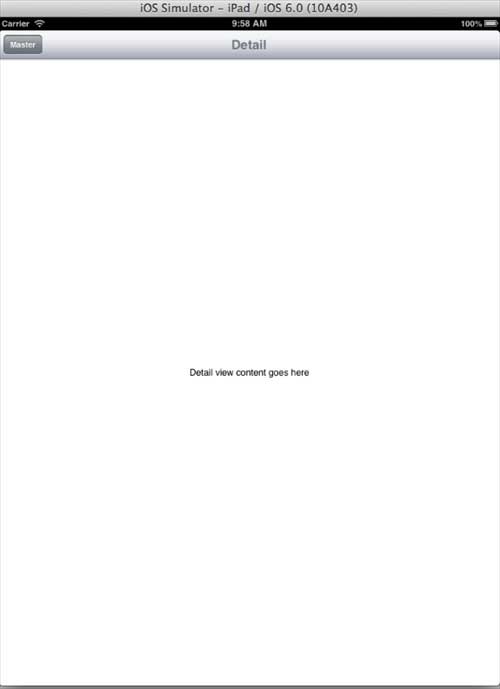
步骤 11 − 当我们切换到纵向模式时,我们将得到以下输出 −