Android - 列表片段
框架的 ListFragment 的静态库支持版本。 用于编写在 Android 3.0 之前的平台上运行的应用程序。 在 Android 3.0 或更高版本上运行时,仍然使用此实现。
列表片段的基本实现是用于在片段中创建项目列表
列表片段
示例
本示例将向您说明如何基于 arrayAdapter 创建自己的列表片段。 因此,让我们按照以下步骤类似于我们在创建 Hello World 示例时所遵循的步骤 −
| 步骤 | 描述 |
|---|---|
| 1 | 您将使用 Android Studio 创建一个 Android 应用程序,并将其命名为 SimpleListFragment,位于包 com.example.tutorialspoint7.myapplication 下,Activity 为空白。 |
| 2 | 修改已放置在 res/values/string.xml 的字符串文件以添加新的字符串常量 |
| 3 | 在目录 res/layout 下创建一个名为 list_fragment.xml 的布局来定义您的列表片段。 并将片段标签(<fragment>)添加到您的 activity_main.xml |
| 4 | 创建一个 myListFragment.java,它位于 java/myListFragment.java 并包含 onCreateView()、onActivityCreated() 和 OnItemClickListener() |
| 5 | 运行应用程序以启动 Android 模拟器并验证应用程序中所做更改的结果。 |
在开始编码之前,我将在 res/values 目录下的 string.xml 文件中初始化字符串常量
<?xml version="1.0" encoding="utf-8"?>
<resources>
   <string name="app_name">ListFragmentDemo</string>
   <string name="action_settings">Settings</string>
   <string name="hello_world">Hello world!</string>
   <string name="imgdesc">imgdesc</string>

   <string-array name="Planets">
      <item>Sun</item>
      <item>Mercury</item>
      <item>Venus</item>
      <item>Earth</item>
      <item>Mars</item>
      <item>Jupiter</item>
      <item>Saturn</item>
      <item>Uranus</item>
      <item>Neptune</item>
   </string-array>

</resources>
以下是 res/layout/activity_main.xml 文件的内容。 它包含线性布局和片段标签。
<?xml version="1.0" encoding="utf-8"?>
<LinearLayout
   xmlns:android="http://schemas.android.com/apk/res/android"
   android:layout_width="match_parent"
   android:layout_height="match_parent"
   android:orientation="vertical" >

   <fragment
      android:id="@+id/fragment1"
      android:name="com.example.tutorialspoint7.myapplication.MyListFragment"
      android:layout_width="match_parent"
      android:layout_height="match_parent" />

</LinearLayout>
以下是 res/layout/list_fragment.xml 文件的内容。 它包含线性布局、列表视图和文本视图
<?xml version="1.0" encoding="utf-8"?>
<LinearLayout
   xmlns:android="http://schemas.android.com/apk/res/android"
   android:layout_width="match_parent"
   android:layout_height="match_parent"
   android:orientation="vertical" >

   <ListView
      android:id="@android:id/list"
      android:layout_width="match_parent"
      android:layout_height="wrap_content" >
   </ListView>

   <TextView
      android:id="@android:id/empty"
      android:layout_width="match_parent"
      android:layout_height="wrap_content" >
   </TextView>
</LinearLayout>
以下将是 src/main/java/myListFragment.java 文件的内容。在编写代码之前,需要按照如下所示的几个步骤进行操作
创建一个 MyListFragment 类并将其扩展到 ListFragment。
在 onCreateView() 方法中,使用上面定义的 list_fragment xml 布局扩展视图。
在 onActivityCreated() 方法中,从资源创建一个arrayadapter,即使用可以在string.xml 中找到的字符串数组R.array.planet,并将此适配器设置为listview,并设置onItem 单击监听器。
在 OnItemClickListener() 方法中,显示一条 Toast 消息,其中包含正在单击的项目名称。
package com.example.tutorialspoint7.myapplication;

import android.annotation.SuppressLint;
import android.app.ListFragment;
import android.os.Bundle;

import android.view.LayoutInflater;
import android.view.View;
import android.view.ViewGroup;

import android.widget.AdapterView;
import android.widget.AdapterView.OnItemClickListener;
import android.widget.ArrayAdapter;
import android.widget.Toast;

public class MyListFragment extends ListFragment implements OnItemClickListener {
   @Override
   public View onCreateView(LayoutInflater inflater,
      ViewGroup container, Bundle savedInstanceState) {
      View view = inflater.inflate(R.layout.list_fragment, container, false);
      return view;
   }

   @Override
   public void onActivityCreated(Bundle savedInstanceState) {
      super.onActivityCreated(savedInstanceState);
      ArrayAdapter adapter = ArrayAdapter.createFromResource(getActivity(),
         R.array.Planets, android.R.layout.simple_list_item_1);
      setListAdapter(adapter);
      getListView().setOnItemClickListener(this);
   }

   @Override
   public void onItemClick(AdapterView<?> parent, View view, int position,long id) {
      Toast.makeText(getActivity(), "Item: " + position, Toast.LENGTH_SHORT).show();
   }
}
以下代码是 MainActivity.java 的内容
package com.example.tutorialspoint7.myapplication;

import android.support.v7.app.AppCompatActivity;
import android.os.Bundle;

public class MainActivity extends AppCompatActivity {

   @Override
   protected void onCreate(Bundle savedInstanceState) {
      super.onCreate(savedInstanceState);
      setContentView(R.layout.activity_main);
   }
}
以下代码将是 manifest.xml 的内容,它已放在 res/AndroidManifest.xml
<?xml version="1.0" encoding="utf-8"?>
<manifest xmlns:android="http://schemas.android.com/apk/res/android"
   package="com.example.tutorialspoint7.myapplication">

   <application
      android:allowBackup="true"
      android:icon="@mipmap/ic_launcher"
      android:label="@string/app_name"
      android:supportsRtl="true"
      android:theme="@style/AppTheme">
      <activity android:name=".MainActivity">
         <intent-filter>
            <action android:name="android.intent.action.MAIN" />

            <category android:name="android.intent.category.LAUNCHER" />
         </intent-filter>
      </activity>
   </application>
</manifest>
运行应用程序
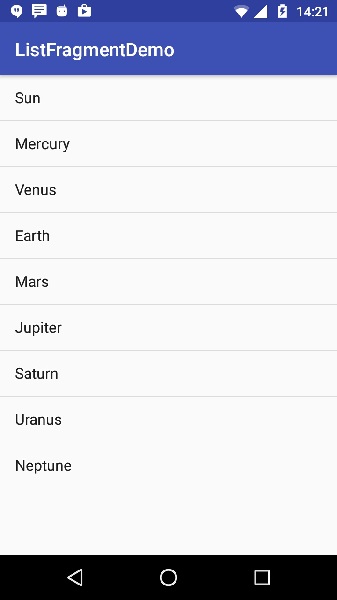
让我们尝试运行我们刚刚创建的 SimpleListFragment 应用程序。假设您在进行环境设置时已经创建了 AVD。 要从 Android Studio 运行应用程序,请打开项目的活动文件之一,然后单击工具栏中的 Run  图标。Android 会在您的 AVD 上安装应用程序并启动它,如果您的设置和应用程序一切正常,它将显示以下 Emulator 窗口 −